
This is a simple example of a localized Android application.
Download: Eclipse Android Application Project - I18N.zip
The following document in the Android developer site introduces how to internationalize (I18N) and localize (L10N) your Android application. The site also provides a sample application for automatically switching graphics as well as text for different languages and regions.
In this sample applicaiton, I will follow an I18N/L10N method used by Kobu.Com in creating an Android application that simultaneously supports English and Japanese. I call this "non-native english speaker's localization strategy".
Here is a summarized explanation of the localization method described here.
By first supporting English, the application can cover a considerable part of the world. Becuase there is a lot of people who understand English although their native language is different from it. This adds to the people in English language areas. After that, it is easy to support any other language than English and your native tongue if you have a need and resource.
In the rest of this page, I will show you how to localize an Android application. That work was painless because the I18N mechanism provided by Android OS matches very well with the non-native english speaker's strategy.
With an Android smartphone or tablet, you can change the language you want to use in the settings screen.
For example, to change from English to Japanese, select [Settings], [Language & Keyboard], [Select Language] and touch Japanese.
Android restarts the currently executing activiy when the user switches the language.
That is, the activity initialization method, onCreate() will be called.
So you don't have to worry what if the user switches the language while the application is running.
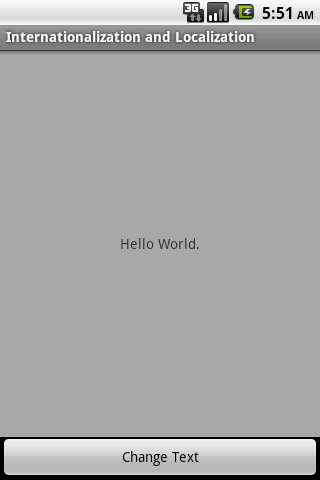
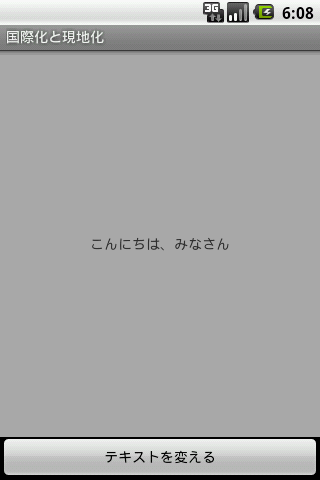
Here is the first screen of the sample application. The left one is shown if the language is set to English while the right one is shown if the language is set to Japanese. The left English screen is shown if the language is set to other language than English or Japanese.
You see three character strings on these screens. The top one on the header is the application's activity name, the middle one is a string set to a text view widget, and the bottom one is a name of a button.
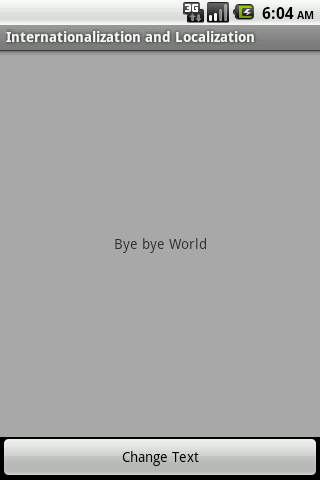
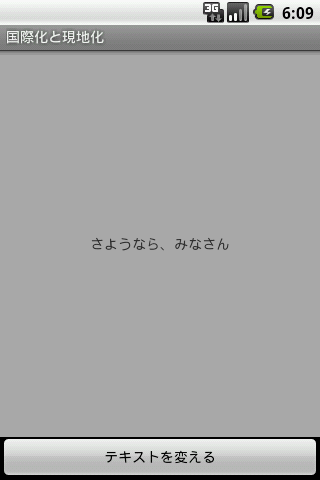
If you touch the bottom button, another text is set to the text view as shown below.
That's all.
The point is how to make things work so that a string of a seleteced language will be shown.
In simple words, strings are kept in an external file, not in the program code. The program code references one of the strings as it needs one. In Android, a screen layout is also stored in an external definition file. It is necessary to make a reference from the layout definition to strings in the external file.
In an Android application, strings to be localized are stored in a string resouce file.
A string resource file resides in values folder in res folder under the application folder.
You can give it any name but it is usually named strings.xml.
A string resource file is an XML file. You can edit a resource file with a text editor or the graphical editor provided by the Android plugin for Eclipse.
The following is this application's string resource file for English.
<?xml version="1.0" encoding="utf-8"?>
<resources>
    <string name="app_name">Internationalization and Localization</string>
    <string name="hello">Hello World.</string>
    <string name="byebye">Bye bye World</string>
    <string name="button">Change Text</string>
</resources>
The next is the Japanese resource file.
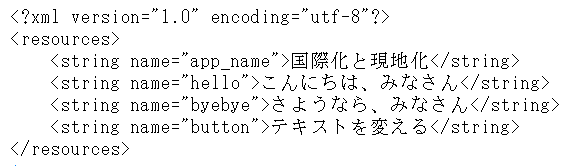
As you can see, specifying a key such as "hello" or "byebye" will give you a greeting string suitable for English or Japanese.
This decision is made automatically by Android side.
The mechanism is simple.
If the current language setting is xx, strings.xml in values-xx will be referenced.
It is values-ja for Japanese and values-en for English.
If no values-xx is prepared for some xx, strings.xml in just values without xx will be referenced.
In other words, for a language with values-xx, strings.xml in that folder will be referenced.
For other languages without values-xx, strings.xml in the default values will be referenced.
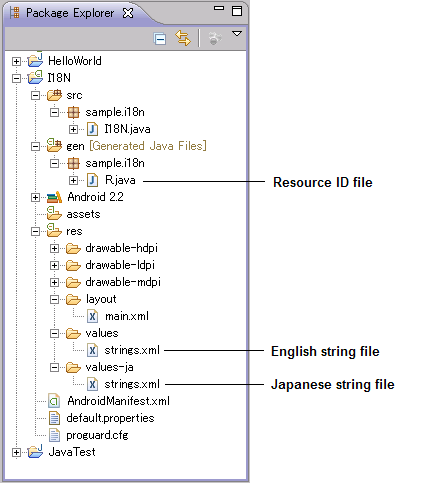
In order to take the non-english speaker's strategy, English should be the default language while the Japanese, my mother tongue, is the first localized language.
The English strings will be stored in values/strings.xml and the Japanese strings are stored in values-ja/strings.xml.
The values-ja/strings.xml is used only if the language is set to Japanese.
Otherwise, default values/strings.xml is used.
The English strings will be displayed if the user's language is set to English (en), Korean (ko) or German (de), to name a few.
It is easy to reference a string in the string resource file within a program code.
public class I18N extends Activity ... {

    ...

    public void onClick(View v) {
        if (v.getId() == R.id.button1) {
            String greeing = getString(R.string.byebye);
            textView.setText(greeting);
        }
    }
}
The getString is a method defined in the Context class (android.content.Context) which is one of the superclasses of the Activity class (android.app.Activity).
You can call this one-shot method to get a localized string.
You may wonder what is "R.string" here.
This is an ID automatically generated by the Android plugin when you add a string to a resource file.
It resides in R.java in gen folder under the application folder.
/* AUTO-GENERATED FILE.  DO NOT MODIFY.
 *
 * This class was automatically generated by the
 * aapt tool from the resource data it found.  It
 * should not be modified by hand.
 */

package sample.i18n;

public final class R {
    public static final class attr {
    }
    public static final class drawable {
        public static final int icon=0x7f020000;
    }
    public static final class id {
        public static final int button1=0x7f050001;
        public static final int textView1=0x7f050000;
    }
    public static final class layout {
        public static final int main=0x7f030000;
    }
    public static final class string {
        public static final int app_name=0x7f040000;
        public static final int button=0x7f040003;
        public static final int byebye=0x7f040002;
        public static final int hello=0x7f040001;
    }
}
As you can see, you can reference an ID of a graphics file such as an icon, layout definition and UI component as well as a string.
It is common in writing an Android application that UI components (widgets) and their placement on the screen are described in an XML file called layout file. To localize a name or text set to a widget, specify an ID of a string resource in the layout file.
A layout file can be edited with a graphical editor in the Android plugin; the result will be the following XML file:
<?xml version="1.0" encoding="utf-8"?>
<LinearLayout xmlns:android="http://schemas.android.com/apk/res/android"
    android:orientation="vertical" android:layout_width="fill_parent"
    android:layout_height="fill_parent">
    <TextView android:layout_weight="0.9" android:id="@+id/textView1"
        android:text="@string/hello" android:layout_width="match_parent"
        android:layout_height="match_parent"
        android:gravity="center" android:isScrollContainer="true"
        android:background="#AAAAAA" android:textColor="#333333">
    </TextView>
    <Button android:layout_width="match_parent"
        android:layout_height="wrap_content" android:id="@+id/button1"
        android:layout_weight="0.1" android:text="@string/button"
        android:gravity="center">
    </Button>
</LinearLayout>
The syntax for referencing a string resource within a layout XML file is "@string/<id>". You can see that the TextView in the middle of the screen is given "hello" resulting the string of "Hello World" if in English. The Button at the bottom is given "button" so its name will be "Change Text" in English.
By the way, one of strings defined in strings.xml has not been used yet.
App_name is already defined when you create an Android project in Eclipse.
It is referenced in the application definition file (AndroidManifest.xml).
This string is displayed beneath the icon in the home screen or at the top of the screen while the application is running.
This means name of an application (or activity) is also localizable.
<?xml version="1.0" encoding="utf-8"?>
<manifest xmlns:android= ...

    <application android:icon="@drawable/icon" android:label="@string/app_name">
        <activity android:name=".I18N"
                  android:label="@string/app_name">
            <intent-filter>
                <action android:name="android.intent.action.MAIN" />
                <category android:name="android.intent.category.LAUNCHER" />
            </intent-filter>
        </activity>
    </application>

</manifest>
Finally, to make it perfect, I list the Java code for the activity of this sample application.
package sample.i18n;

import java.util.Locale;

import android.app.Activity;
import android.os.Bundle;
import android.util.Log;
import android.view.View;
import android.view.View.OnClickListener;
import android.widget.Button;
import android.widget.TextView;

// Sample application for demonstrating non-English-speaker's
// localization strategy.
// 2011 Apr 17 Written for test by ARAI, Bunkichi, Kobu.Com,
// 2011 Jul 24 Updated for demonstration

public class I18N extends Activity implements OnClickListener {

    private String logtag = getClass().getSimpleName();

    private TextView textView;

    @Override
    public void onCreate(Bundle savedInstanceState) {
        super.onCreate(savedInstanceState);
        setContentView(R.layout.main);

        textView = (TextView) findViewById(R.id.textView1);

        Button button = (Button) findViewById(R.id.button1);
        button.setOnClickListener(this);

        Locale locale = Locale.getDefault(); // current locale
         Locale locale = getResources().getConfiguration().locale;  or you can ...
        Log.d(logtag, "lang = " + locale.getLanguage());
    }

    @Override
    public void onClick(View v) {
        if (v.getId() == R.id.button1) {
            textView.setText(getString(R.string.byebye)); // set localized text
             textView.setText(R.string.byebye);  or you can do it faster
        }
    }
}
This is the end of introduction to a simple localization of an Android application.
All the external resource files listed above and the source code are included in the Eclipse project you can download.
Download: Eclipse Android Application Project - I18N.zip
Other localization samples provided in this site are:
Kobu.Com has a lot of experiences in authoring software and documentation usable world-wide.
Copyright © 2011 Kobu.Com. All rights reserved.
Author: ARAI Bunkichi
Presented by: Kobu.Com
Written 2011 Jul 25
The published sample code is a prototype and is not complete.
Please refrain from duplicating the sample code and its document in another place.
This page is link-free. We welcome your questions and comments.